Kubernetes initializes cluster configuration
By default, the RKE cluster parameter configuration is generated by default, and the user only needs to fill in IP port node type.But in some advanced scenarios, users need to customize cluster parameters, such as modifying network plugin Kubelet parameters , etc. Custom RKE cluster parameter configuration will be useful to you.
In order to automate the configuration with best practice parameters, the user threshold is reduced.Please configure it with caution until you fully master the RKE configuration parameter configuration.
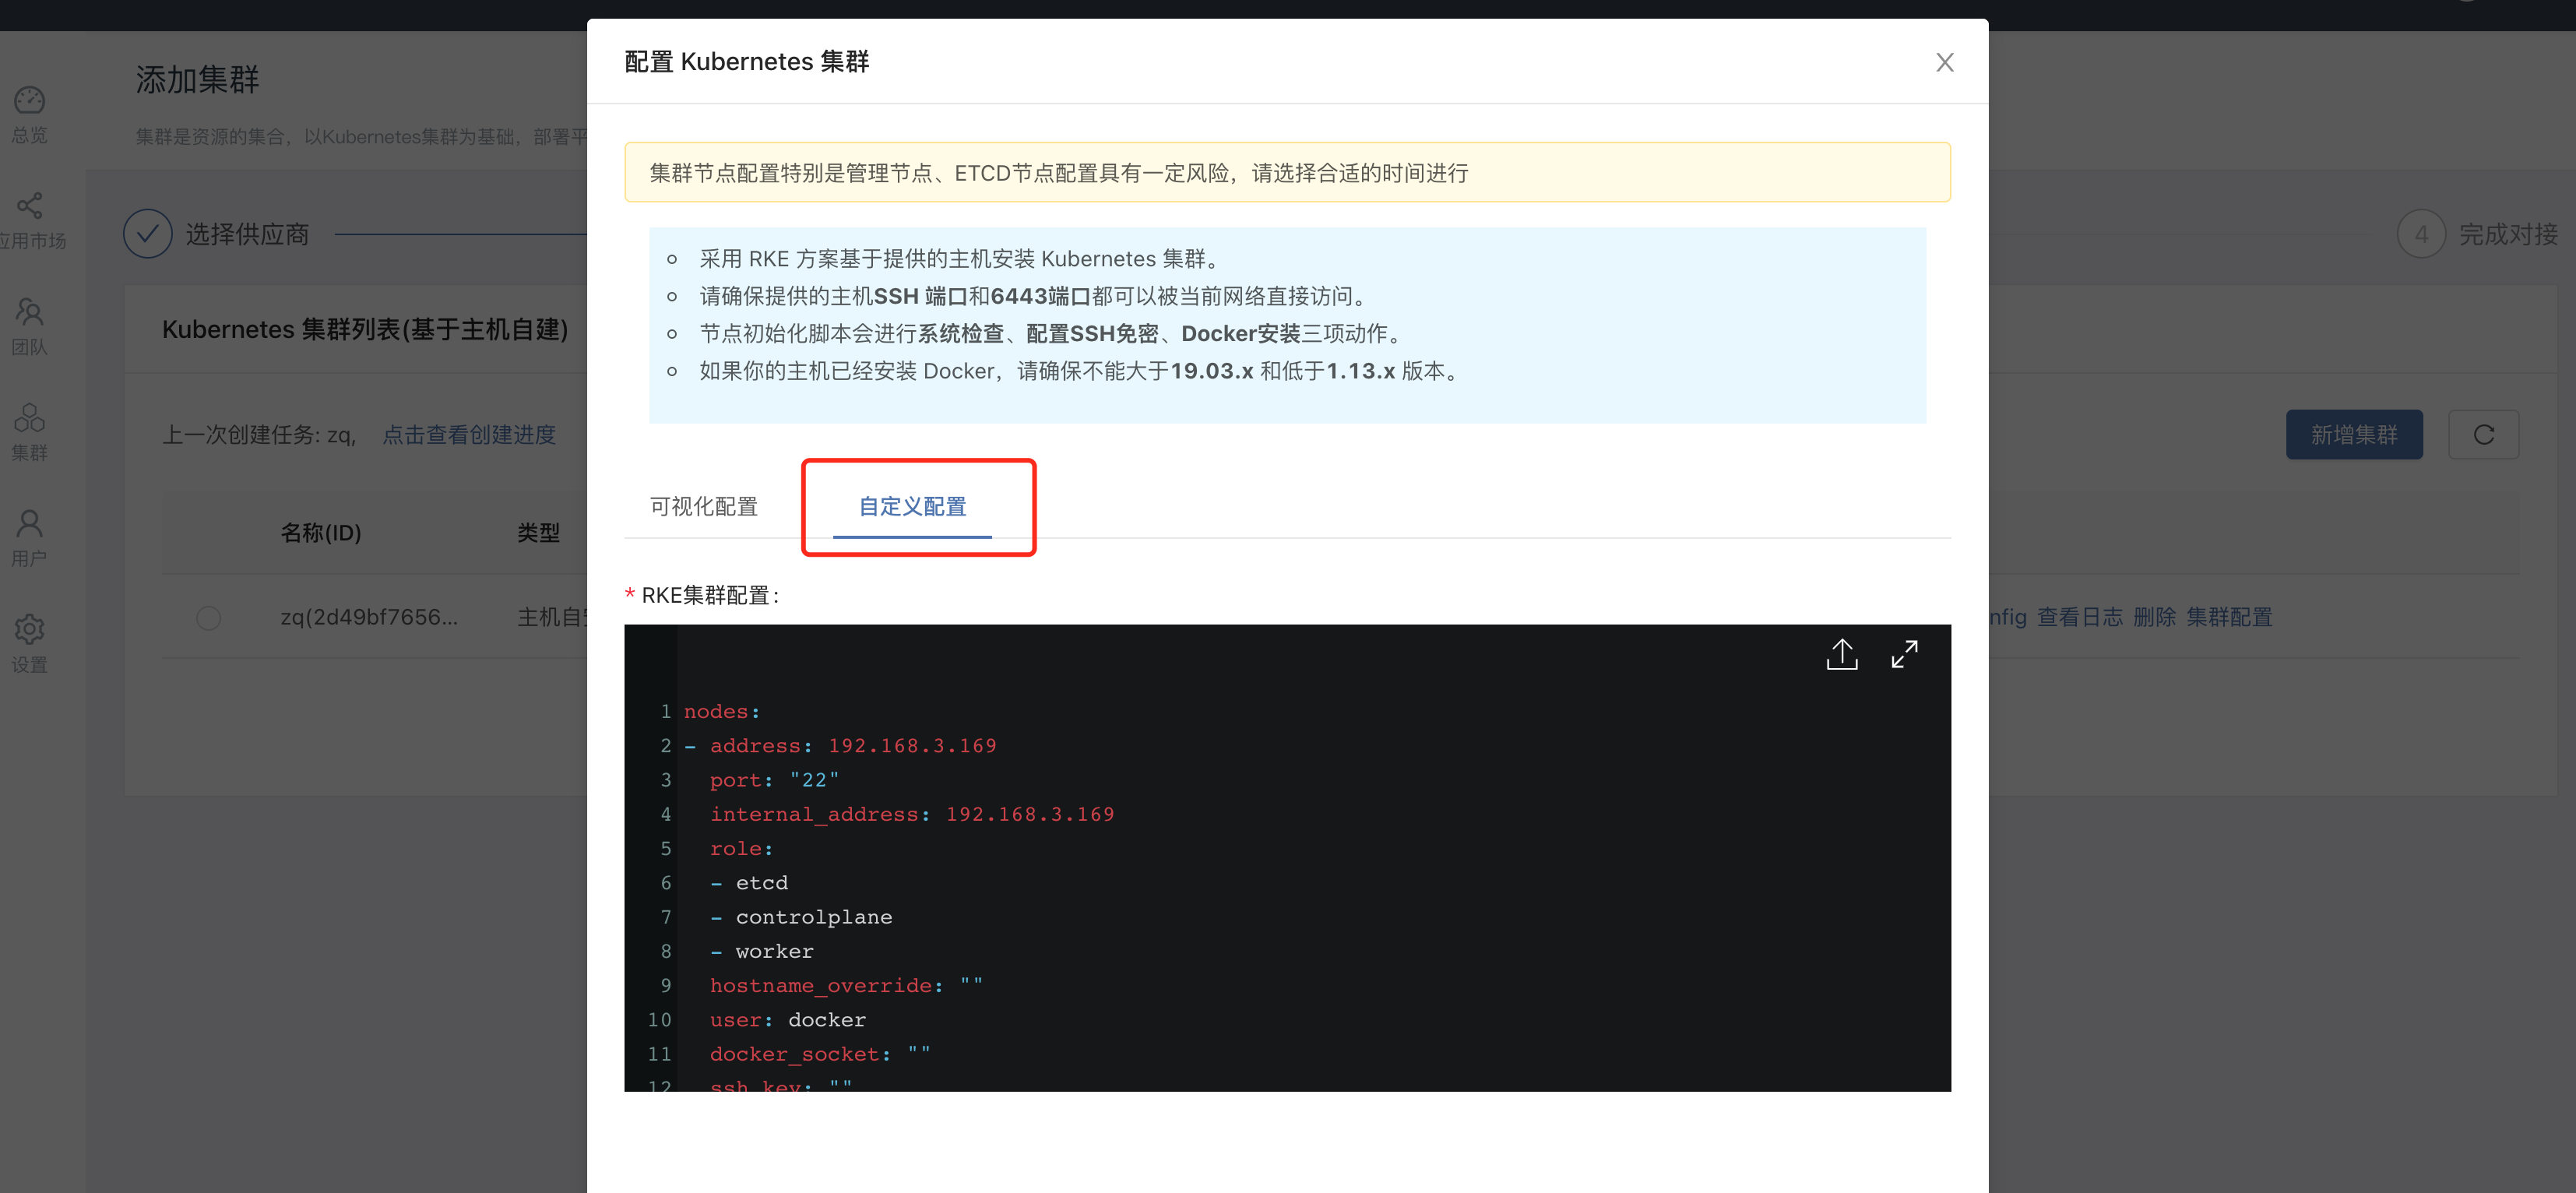
As shown in the figure above, when entering the Kubernetes cluster configuration page, click the red box to configure the Kubernetes cluster parameters.
The configuration example is as follows:
For more details, please refer to RKE official documentation
nodes:
- address: 192.168.3.169
  port: "22"
  internal_address: 192.168.3.169
  role:
  - etcd
  - controlplane
  - worker
  hostname_override: ""
  user: docker
  docker_socket: ""
  ssh_key: ""
  ssh_key_path: ~/.ssh/id_rsa
  ssh_cert: ""
  ssh_cert_path: ""
  labels: {}
   # app: ingress
  taints: []
   # - key: test-key
   #   value: test-value
   #   effect: NoSchedule


# 检测docker版本,为false时如果docker版本RKE不支持则安装失败
ignore_docker_version: false
# 集群级密钥证书路径
ssh_key_path: ""
ssh_cert_path: ""
# Enable use of SSH agent to use SSH private keys with passphrase
# This requires the environment `SSH_AUTH_SOCK` configured pointing
# to your SSH agent which has the private key added
ssh_agent_auth: false
# 私有镜像仓库
private_registries:
- url: registry.com
  user: Username
  password: password
  is_default: true
# 堡垒机/跳板机 配置
bastion_host:
  address: x.x.x.x
  user: docker
  port: 22
  ssh_key_path: /home/user/.ssh/bastion_rsa
# or
#   ssh_key: |-
#     -----BEGIN RSA PRIVATE KEY-----
#
#     -----END RSA PRIVATE KEY-----

# 设置 Kubernetes 集群名称
cluster_name: mycluster

# Kubernetes 版本
kubernetes_version: ""

# 系统镜像
system_images:
  etcd: ""
  alpine: ""
  nginx_proxy: ""
  cert_downloader: ""
  kubernetes_services_sidecar: ""
  kubedns: ""
  dnsmasq: ""
  kubedns_sidecar: ""
  kubedns_autoscaler: ""
  coredns: ""
  coredns_autoscaler: ""
  nodelocal: ""
  kubernetes: ""
  flannel: ""
  flannel_cni: ""
  calico_node: ""
  calico_cni: ""
  calico_controllers: ""
  calico_ctl: ""
  calico_flexvol: ""
  canal_node: ""
  canal_cni: ""
  canal_controllers: ""
  canal_flannel: ""
  canal_flexvol: ""
  weave_node: ""
  weave_cni: ""
  pod_infra_container: ""
  ingress: ""
  ingress_backend: ""
  metrics_server: ""
  windows_pod_infra_container: ""
  aci_cni_deploy_container: ""
  aci_host_container: ""
  aci_opflex_container: ""
  aci_mcast_container: ""
  aci_ovs_container: ""
  aci_controller_container: ""
  aci_gbp_server_container: ""
  aci_opflex_server_container: ""
services:
  etcd:
    # etcd目录和文件 自定义uid/gid
    uid: 52034
    gid: 52034
    # 如果使用外部etcd则填写以下内容
    # path: /etcdcluster
    # external_urls:
    #   - https://etcd-example.com:2379
    # ca_cert: |-
    #   -----BEGIN CERTIFICATE-----
    #   xxxxxxxxxx
    #   -----END CERTIFICATE-----
    # cert: |-
    #   -----BEGIN CERTIFICATE-----
    #   xxxxxxxxxx
    #   -----END CERTIFICATE-----
    # key: |-
    #   -----BEGIN PRIVATE KEY-----
    #   xxxxxxxxxx
    #   -----END PRIVATE KEY-----

  kube-api:
    # 在Kubernetes上创建的IP范围必须与 kube-controller 中的 service_cluster_ip_range 匹配
    service_cluster_ip_range: 10.43.0.0/16
    # 为NodePort服务公开不同的端口范围
    service_node_port_range: 30000-32767
    pod_security_policy: false
    image: ""
    extra_args: {}
    extra_binds: []
    extra_env: []
    win_extra_args: {}
    win_extra_binds: []
    win_extra_env: []
    pod_security_policy: false
    always_pull_images: false
    secrets_encryption_config: null
    audit_log: null
    admission_configuration: null
    event_rate_limit: null
  kube-controller:
    # CIDR池用于为集群中的pod分配IP地址
    cluster_cidr: 10.42.0.0/16
    # 在Kubernetes上创建的服务的IP范围必须与kube-api中的service_cluster_ip_range匹配
    service_cluster_ip_range: 10.43.0.0/16
    # 添加一些额外的参数
    extra_args:
    # 例如:设置日志输出的级别为调试级别
    v: 4
  kubelet:
    # 集群域
    cluster_domain: cluster.local
    # DNS服务IP地址
    cluster_dns_server: 10.43.0.10
    # 如果交换处于开启状态,则失败
    fail_swap_on: false
    # 配置 pod-infra-container-image
    pod-infra-container-image: "k8s.gcr.io/pause:3.2"
        # 生成kubelet服务证书
    generate_serving_certificate: true
    # 添加一些额外的参数
    extra_args:
      # 设置pod最大250,而不是默认的110
      max-pods: 250
    # 存储卷绑定
    extra_binds:
    - /grlocaldata:/grlocaldata:rw,z
  scheduler:
    image: ""
    extra_args: {}
    extra_binds: []
    extra_env: []
    win_extra_args: {}
    win_extra_binds: []
    win_extra_env: []
  kubeproxy:
    image: ""
    extra_args: {}
    extra_binds: []
    extra_env: []
    win_extra_args: {}
    win_extra_binds: []
    win_extra_env: []
# x509认证策略
authentication:
  strategy: x509
  sans: []
  webhook: null
# Kubernetes 授权模式
# 使用 `mode: rbac` 开启 RBAC
# 使用 `mode: none` 关闭 授权
authorization:
  mode: rbac

# job 超时时间 30s
addon_job_timeout: 30

# 可选网络插件 (canal, calico, flannel, weave, or none)
network:
  plugin: flannel
  options: {}
  mtu: 0
  node_selector: {}
  update_strategy: null
  tolerations: []

# 可选DNS (coredns or kube-dns or null)
dns: null
# 指定监控供应商 (metrics-server)
monitoring:
  provider: none
The above configuration basically does not need to be modified, and most users can meet their needs through visual configuration.
To modify, modify the configuration file as required, such as:
Modify the network plugin to calico, modify
network.plugintocalicoBy default, the calico image will be pulled from dockerhub. If you need to customize the image address, please specify the image address in system_images
network:
  plugin: calico
- After modifying the configuration, click Update Cluster and wait for the cluster update to complete.