Host-based high availability installation
This article describes how to deploy a highly available Rainbond cluster, suitable for production environments, without providing a Kubernetes cluster.
Preconditions
- Prepare relevant resources according to software and hardware environment requirements;
- If you use CentOS 7.* operating system, please be sure to upgrade kernel version in advance
- Ensure that the server
80, 443, 6060, 6443, 7070, 8443ports can be accessed; - The server needs to be configured with a static IP;
- Confirm that the system time is synchronized with the time zone (Asia/Shanghai), and the time between nodes is synchronized;
- When there are multiple nodes, there is no restriction on network access between machines;
- The server can connect to the Internet normally, and the installation process will download the required resources from the Internet;
- For high-availability external databases, such as MySQL 8.0 database cluster or RDS database service, two databases,
consoleandregion, need to be created in advance, and the database character encoding isutf8mb4.
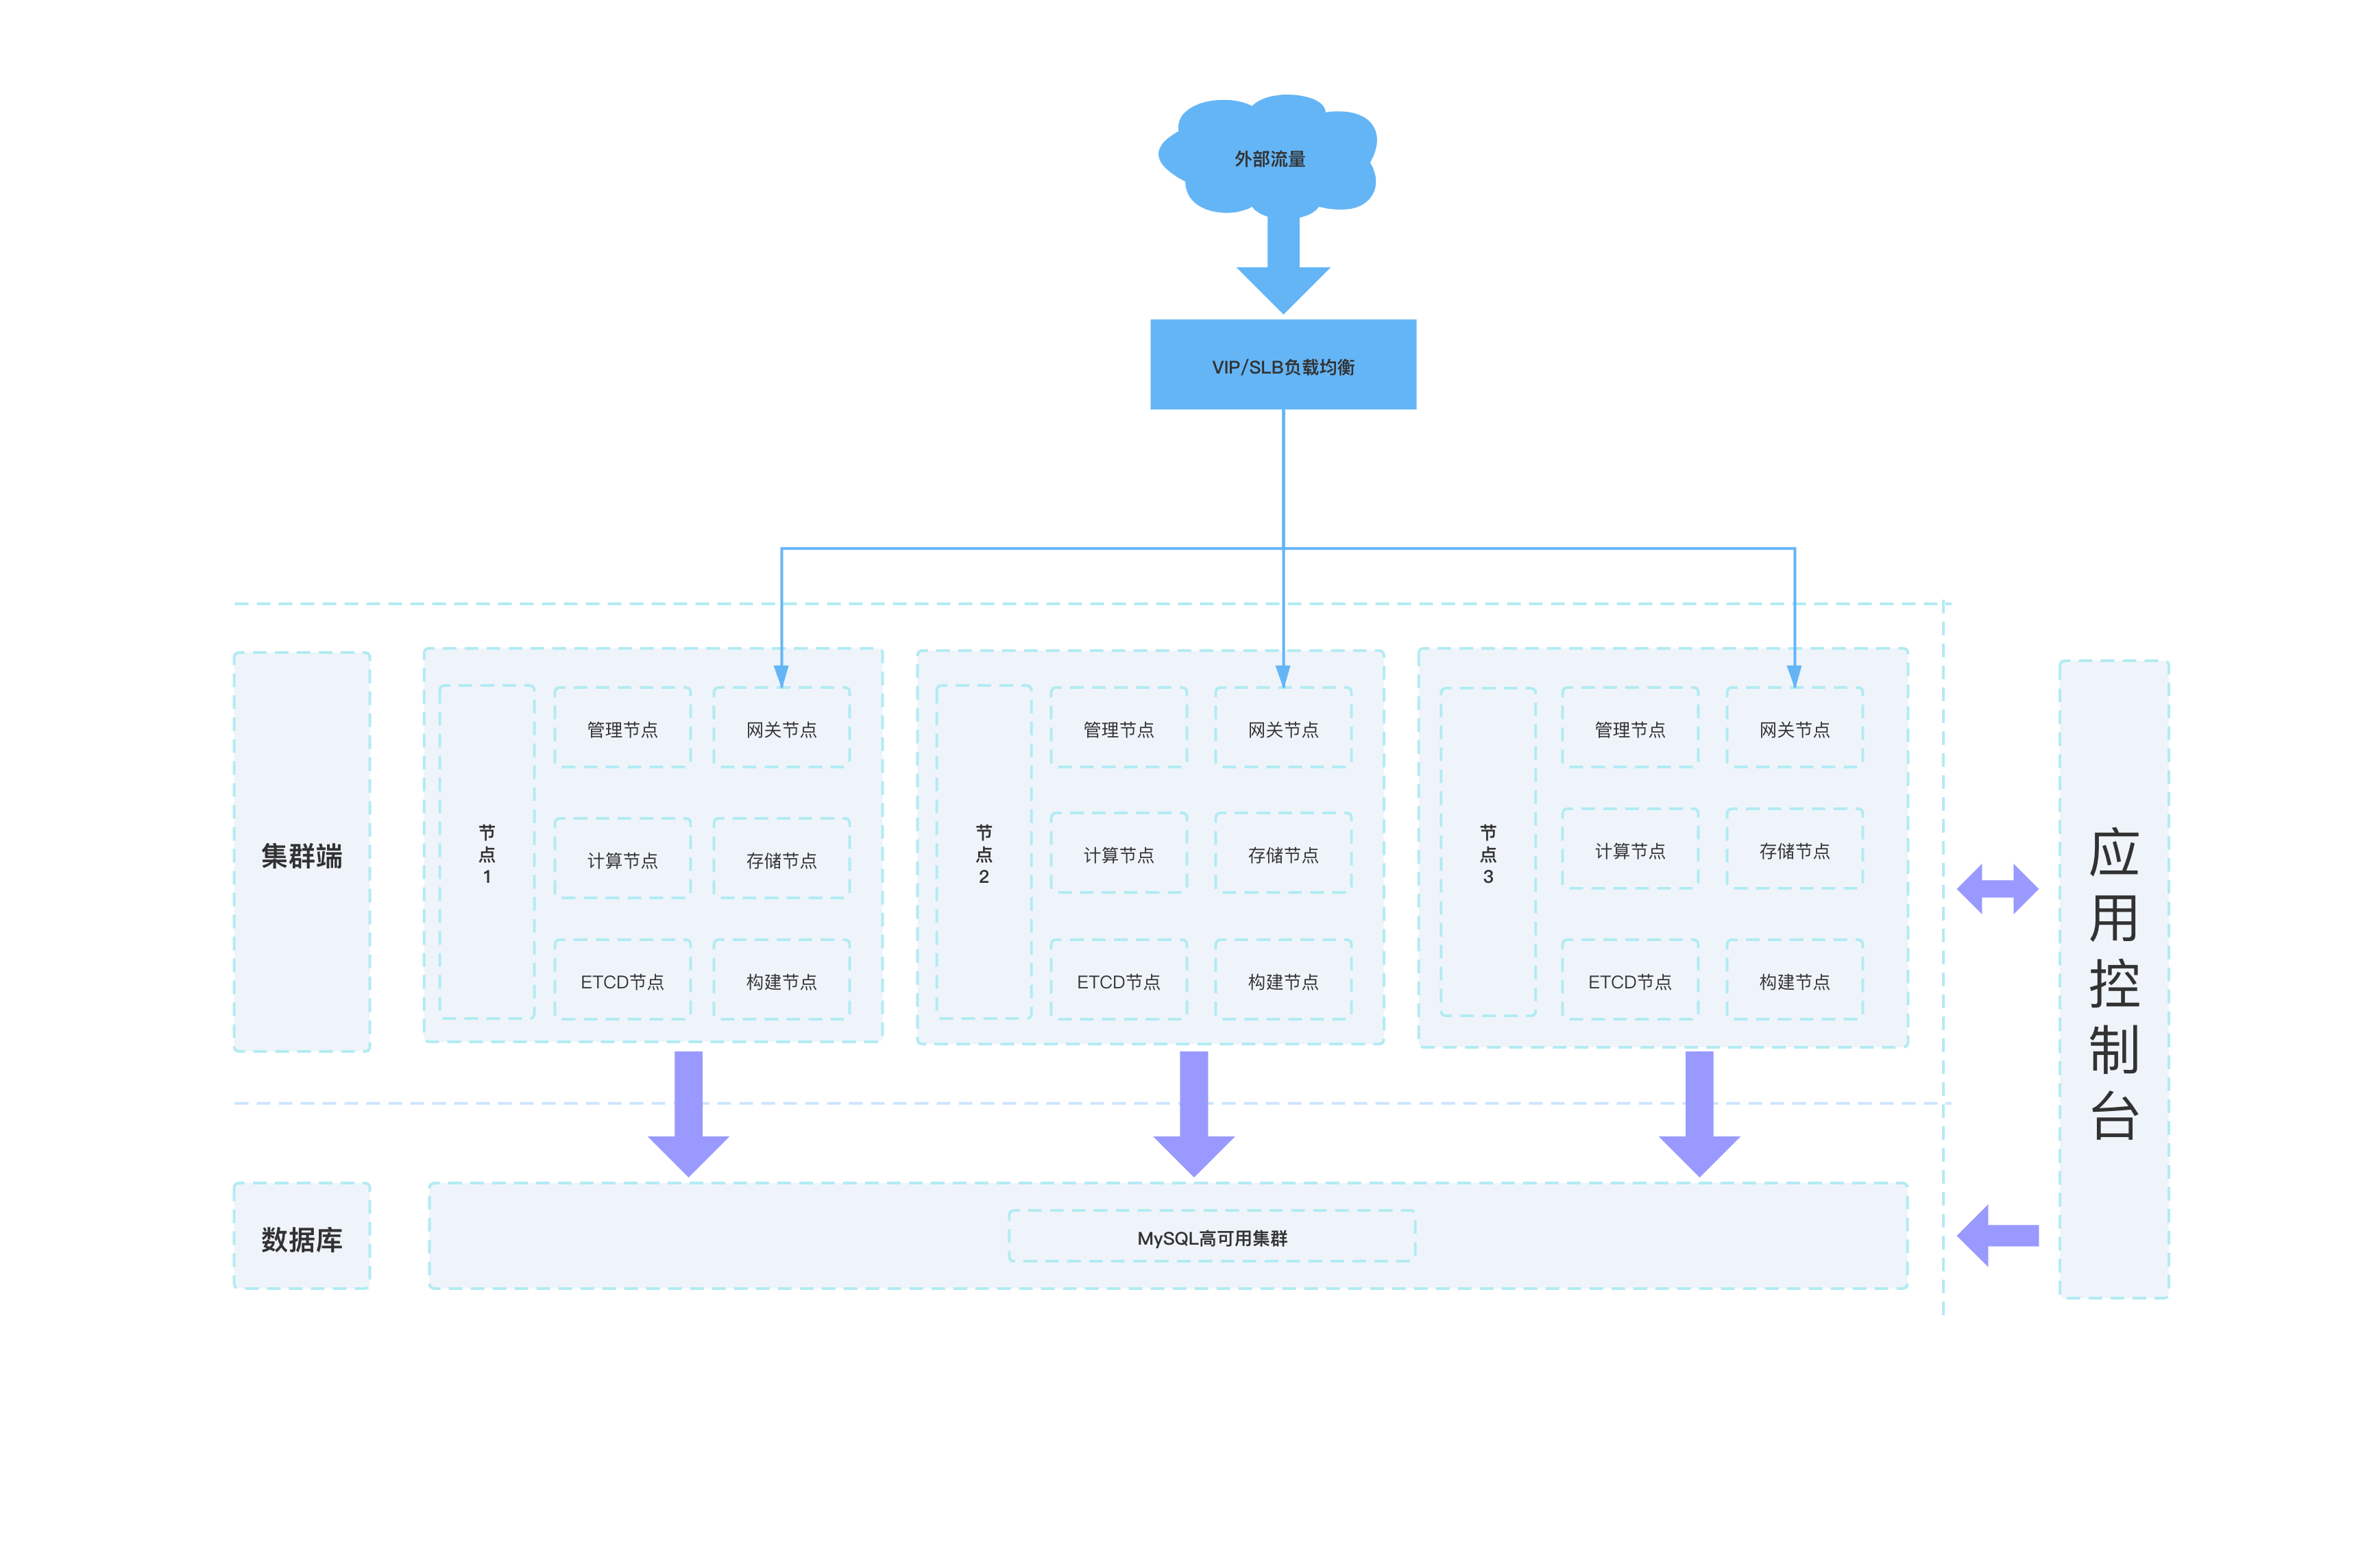
1. Server configuration
This article uses the minimum number of servers required for a high-availability installation and reuses role attributes to build a high-availability Rainbond cluster.
The cluster architecture is shown in Figure:
2. Deploy Docker
Execute install Docker action:on all servers that have been prepared
curl sh.rainbond.com/install_docker | bash
3. Deploy MySQL database
Rainbond needs to use MySQL to store data on the console and cluster. If the user already has a high-availability database, it can be used directly. The following conditions must be met::
- The database version is
MySQL5.7/8.0; - Create
consoleandregionlibraries in advance; - The database character encoding is
utf8mb4; - It is recommended that the database be within the same intranet range as Rainbond clusternetwork.
If there is no high-availability database, you can deploy MySQL master-slave replication according toreference document.
4. Deploy the Rainbond console
Start the All-In-One Console
docker run -d -p 7070:7070 \
--name=rainbond-allinone --restart=always \
-v ~/.ssh:/root/.ssh \
-v ~/rainbonddata:/app/data \
-e DB_TYPE=mysql \
-e MYSQL_DB=console \
-e MYSQL_PORT=3306 \
-e MYSQL_HOST=** \
-e MYSQL_USER=** \
-e MYSQL_PASS=** \
-e INSTALL_IMAGE_REPO=rainbond \
rainbond/rainbond:v5.8.1-release-allinone
Note:
- Please replace database connection information with your actual connection information;
- The console will generatepersistent data, which will be stored in the
~/rainbonddatadirectory of your deployment node; - The current version supports consoledata migrationAfter the final deployment is completed, the console needs to be migrated to the platform for deployment to ensure high availability.
After the container is successfully started, after a while, you can access the server 7070 port in the browser, and open the Rainbond console registration page.

At this point, congratulations that you have completed the first step, you still need to continue to complete the deployment of the cluster.
5. Deploy Kubernetes
- Select cluster in the left navigation bar -->add cluster -->start installation from the host, fill in the relevant information
- The currently used Alibaba Cloud server has an external network IP. If the server does not have an external network IP during private deployment, the IP address and the internal network IP address can be uniformly filled in with the server IP address;
- The current demonstration cluster consists of 3 nodes, and the Kubernetes attributes such as, management, and computing attributes are reused. When deploying by yourself, you can select the node attributes according to your own planning and.

- After the node information is filled in, follow the page prompts to copy the node initialization command and execute it on all servers in the cluster

- After the initialization is complete, click , next step, wait for the Kubernetes cluster to be installed successfully, and go to the next step when the status is running and

- Install
kubectlcommand.
In subsequent operations, you need to use thekubectlcommand to create resources such as high-availability storage. For details, see Documentkubectl command line toolInstallation commands.
6. Docking storage
Rainbond supports a variety of shared storage solutions, please choose according to the following scenarios:
- GlusterFS:
When deploying Rainbond on a user-provided server or virtual machine, it is recommended to deploy GlusterFS as a shared storage solution.
For deployment, please refer to Document GlusterFS Distributed Storage.
- Other shared storage compatible with NFS protocol
If the user has other shared storage compatible with the NFS protocol, such as Alibaba Cloud NAS storage, NFS storage (not recommended for high availability environments), Rainbond can also be used.
For details, please refer to Document Connecting to Alibaba Cloud NAS.
7. Prepare for load balancing or Keepalived
Rainbond gateway nodes require VIP or load balancing to ensure high availability.
- load balancing
If there is a load balancer, you can directly use the load balancer service. The load balancer service requires ports80, 443, 6060, 6443, 7070, and 8443 of the proxy gateway node; then fill in the custom cluster initialization parameter in the subsequent operation step **The load balancer address is sufficient.
- Keepalived
If there is no load balancing service, the high availability of the gateway can be ensured by deploying the Keepalived service on the gateway node. In this way, the gateway node has a master-slave relationship. Please refer to:for Keepalived deployment.
CentOS keepalived configuration or Ubuntu keepalived configuration.
8. Deploy Rainbond
After the external database and GlusterFS storage are ready, go back to the console to continue the Rainbond installation process
- Create a
secretcertificate file for ETCD
- The Rainbond cluster needs to use ETCD to store the metadata information of the cluster, cluster status and network configuration. Usually, the Kubernetes cluster ETCD can be reused;
- ETCD has high requirements on disk performance, so be sure to prepare related resources according to software and hardware environment requirements to avoid instability during subsequent use; if ETCD nodes are reused with other attribute nodes, it is strongly recommended to use SSD disks for storage;
- For a Kubernetes cluster installed by default, the etcD certificate files are located in the
/etc/kubernetes/ssldirectory, which arekube-ca.pem, kube-node.pen, kube-node-key.pem; use the following commands Create a secret for direct use during Rainbond installation:
$ kubectl create ns rbd-system
$ kubectl create secret generic rbd-etcd-secret -n rbd-system \
--from-file=ca-file=/etc/kubernetes/ssl/kube-ca.pem \
-- -from-file=cert-file=/etc/kubernetes/ssl/kube-node.pem \
--from-file=key-file=/etc/kubernetes/ssl/kube-node-key.pem
- Initialize the platform cluster
After performing the above operations, select the current cluster on the console page and click Next.

Custom cluster initialization parameters
High-availability installation requires custom cluster initialization parameters, which are configured on the cluster interface of the initialization platform. For specific parameters, refer to document Rainbond Cluster Parameters.

The current demo cluster parameters are as follows:
apiVersion: rainbond.io/v1alpha1
kind: RainbondCluster
metadata:
 name: rainbondcluster
 namespace: rbd-system
spec:
#Install high availability cluster
  enableHA: true
#Define ETCD node information
  etcdConfig:
    endpoints:
    #Server intranet IP: 2379
      - 192.168.0.58:2379
      - 192.168.0.65:2379
      - 192.168.0.66:2379
    secretName: rbd-etcd-secret
#Define the IP address of the VIP or load balancing service
  gatewayIngressIPs:
    - 47.104.140.37
#Define the server address of the source code building service
  nodesForChaos:
    #Fill in the server's external network IP address
    - externalIP: 47.104.110.22
    #Fill in the server's internal network IP address
      internalIP: 192.168.0.58
    #Fill in the pass Node name queried by kubectl get node command
      name: 47.104.110.22
    - externalIP: 47.104.139.60
      internalIP: 192.168.0.65
      name: 47.104.139.60
    - externalIP:

      internalIP: 3 192.168.0 47.104.80.93
#Define the server address of the gateway service
  nodesForGateway:
    #Fill in the external IP address of the server
    - externalIP: 47.104.110.22
    #Fill in the internal IP address of the server
      internalIP: 192.168.0.58
    #Fill in through kubectl get node Node name queried by the command
      name: 47.104.110.22
    - externalIP: 47.104.139.60
      internalIP: 192.168.0.65
      name: 47.104.139.60
    - externalIP : 47.104.80.93
      internalIP: 192.168.0.66
      name: 47.104.80.93
  rainbondVolumeSpecRWX:
#Define the storageClass name of GFS shared storage
    storageClassName: glusterfs-simple
#Define the connection information of the cluster database (region library)
  regionDatabase:
    host: 192.168.0.58
    name: region
    password: Gz1ea3.G
    port: 3306
    username: rainbond
After the cluster parameters are defined, click the to start initialization button. This process will deploy the Rainbond component in the Kubernetes cluster. After the deployment is completed, the interface for connecting to the cluster will be displayed.
- Docking cluster
Fill in cluster ID and cluster name , click the docking button to complete the docking; after the docking is completed, the platform is deployed. It is recommended to refer to the subsequent documents to migrate the console deployed in the All-In-One mode to the Rainbond platform.

9. Migration console
After the deployment is complete, migrate the console deployed in the All-In-One mode to Rainbond for management to make it highly available. Refer to DocumentConsole Migration.
Next step
Refer toQuick Startto deploy your first application.