Deploy API-Gateway on Rainbond
Api-Gateway is a microservice architecture that protects the real business service components behind Kong (a mature implementation of Api-Gateway).Through a wealth of plug-ins, Kong can provide comprehensive protection and governance for back-end business components, including ACL access control, authentication mechanisms such as Basic Auth Oauth2, Rate Limiting, and other excellent functions.How to deploy Kong on Rainbond and briefly introduce the configuration of Service and Route is the subject of the current document.
This document is suitable for developers and operators who intend to deploy and use Api Gateway (Kong) in Rainbond.
The scenario that this document is suitable for is to learn how to deploy Kong on:and proxy the existing test business through demonstration use cases.
Preconditions
- The Kong application template already exists in the local shared library, which can be imported by downloading API-Gateway offline package
Reference video
Steps
Through the one-click installation of the shared library, you can deploy Kong, newinfo, and WebsService (Kong is the implementation of Api Gateway, newinfo, and WebsService are the accompanying test services) into your Rainbond environment.
Install and deploy
- Install the API-Gateway demo use case

- running result

Configure Konga
This link will configure Kong's management panel, which is implemented based on Konga and can manage Kong graphically.
- register
Visit konga's external services and follow the instructions to complete the administrator registration
- Connect to Kong
After the registration is completed, configure the connection address of Kong according to the instructions, enter the custom name of the Kong instance, and the connection address:http://127.0.0.1:8001.
Configure WebService
In this link, Service and Route will be configured for the WebService test business in Konga. After the configuration is completed, the test business can be accessed through Kong.
The WebService test business component is a web page written based on the java language, and the listening port is 5000.When using the Kong proxy, you need to configure two services for itself and the static resources it uses, and the corresponding Route for each service.
- Configure the WebService itself
In Konga, select SERVICESand click ADD NEW SERVICE.
Fill in the content:
| option name | Fill in the content | illustrate |
|---|---|---|
| Name | WebService | Fill in the custom Service name to facilitate the corresponding upstream business |
| Protocol | http | Upstream Service Agreement |
| Host | 127.0.0.1 | The upstream service address, because it uses Rainbond's dependencies, is 127.0.0.1 |
| Port | 5000 | Upstream service listening address |
| Path | / | Upstream service access path |
Enter the created WebService page, select Routes, and click ADD ROUTE.
Fill in the content:
| option name | Fill in the content | illustrate |
|---|---|---|
| Name | WebService_route | Fill in the custom Route name to facilitate the corresponding upstream business |
| Protocols | Leave blank by default | Access protocol, both http and https are used by default |
| Hosts | Leave blank by default | Access address, if left blank, use Kong's port 8000 external service address, you can bind the domain name and fill in |
| Methods | Leave blank by default | Http method, you can fill in GET, POST and other methods according to your needs, the default is unlimited |
| Path | /web | Custom access path, which is proxied to the upstream service's / |
It should be noted that after adding Path, you need to press Enter to take effect. Continue to configure the proxy for Static resources.The static page part of WebService needs a separate proxy.
- Configure for Static resources
In Konga, select SERVICESand click ADD NEW SERVICE.
Fill in the content:
| option name | Fill in the content | illustrate |
|---|---|---|
| Name | WebStatic | Fill in the custom Service name to facilitate the corresponding upstream business |
| Protocol | http | Upstream Service Agreement |
| Host | 127.0.0.1 | The upstream service address, because it uses Rainbond's dependencies, is 127.0.0.1 |
| Port | 5000 | Upstream service listening address |
| Path | /static | Upstream service static resource access path |
Go to the created WebStatic page, select Routes, and click ADD ROUTE.
Fill in the content:
| option name | Fill in the content | illustrate |
|---|---|---|
| Name | WebStatic_route | Fill in the custom Route name to facilitate the corresponding upstream business |
| Protocols | Leave blank by default | Access protocol, both http and https are used by default |
| Hosts | Leave blank by default | Access address, if left blank, use Kong's port 8000 external service address, you can bind the domain name and fill in |
| Methods | Leave blank by default | Http method, you can fill in GET, POST and other methods according to your needs, the default is unlimited |
| Path | /static | Fixed access path, which is proxied to /static for upstream services |
After the configuration is complete, you can access the complete WebService test business by accessing the /web path of the external service of port 8000 of the Kong service component.
configure newinfo
In this link, Service and Route will be configured for the newinfo test business in Konga. After the configuration is complete, the API test business can be accessed through Kong.
The newinfo test business component is an API written based on the Golang language. When a GET request is made, it will obtain data from the mysql it depends on and return it. The listening port is 8080.
- Configure for newinfo
In Konga, select SERVICESand click ADD NEW SERVICE.
Fill in the content:
| option name | Fill in the content | illustrate |
|---|---|---|
| Name | Newinfo | Fill in the custom Service name to facilitate the corresponding upstream business |
| Protocol | http | Upstream Service Agreement |
| Host | 127.0.0.1 | The upstream service address, because it uses Rainbond's dependencies, is 127.0.0.1 |
| Port | 8080 | Upstream service listening address |
| Path | /api/newinfos | Upstream service API path |
Enter the created Newinfo page, select Routes, and click ADD ROUTE.
Fill in the content:
| option name | Fill in the content | illustrate |
|---|---|---|
| Name | Newinfo_route | Fill in the custom Route name to facilitate the corresponding upstream business |
| Protocols | Leave blank by default | Access protocol, both http and https are used by default |
| Hosts | Leave blank by default | Access address, if left blank, use Kong's port 8000 external service address, you can bind the domain name and fill in |
| Methods | Leave blank by default | Http method, you can fill in GET, POST and other methods according to your needs, the default is unlimited |
| Path | /info | Custom access path, which is proxied to the upstream service's /api/newinfos |
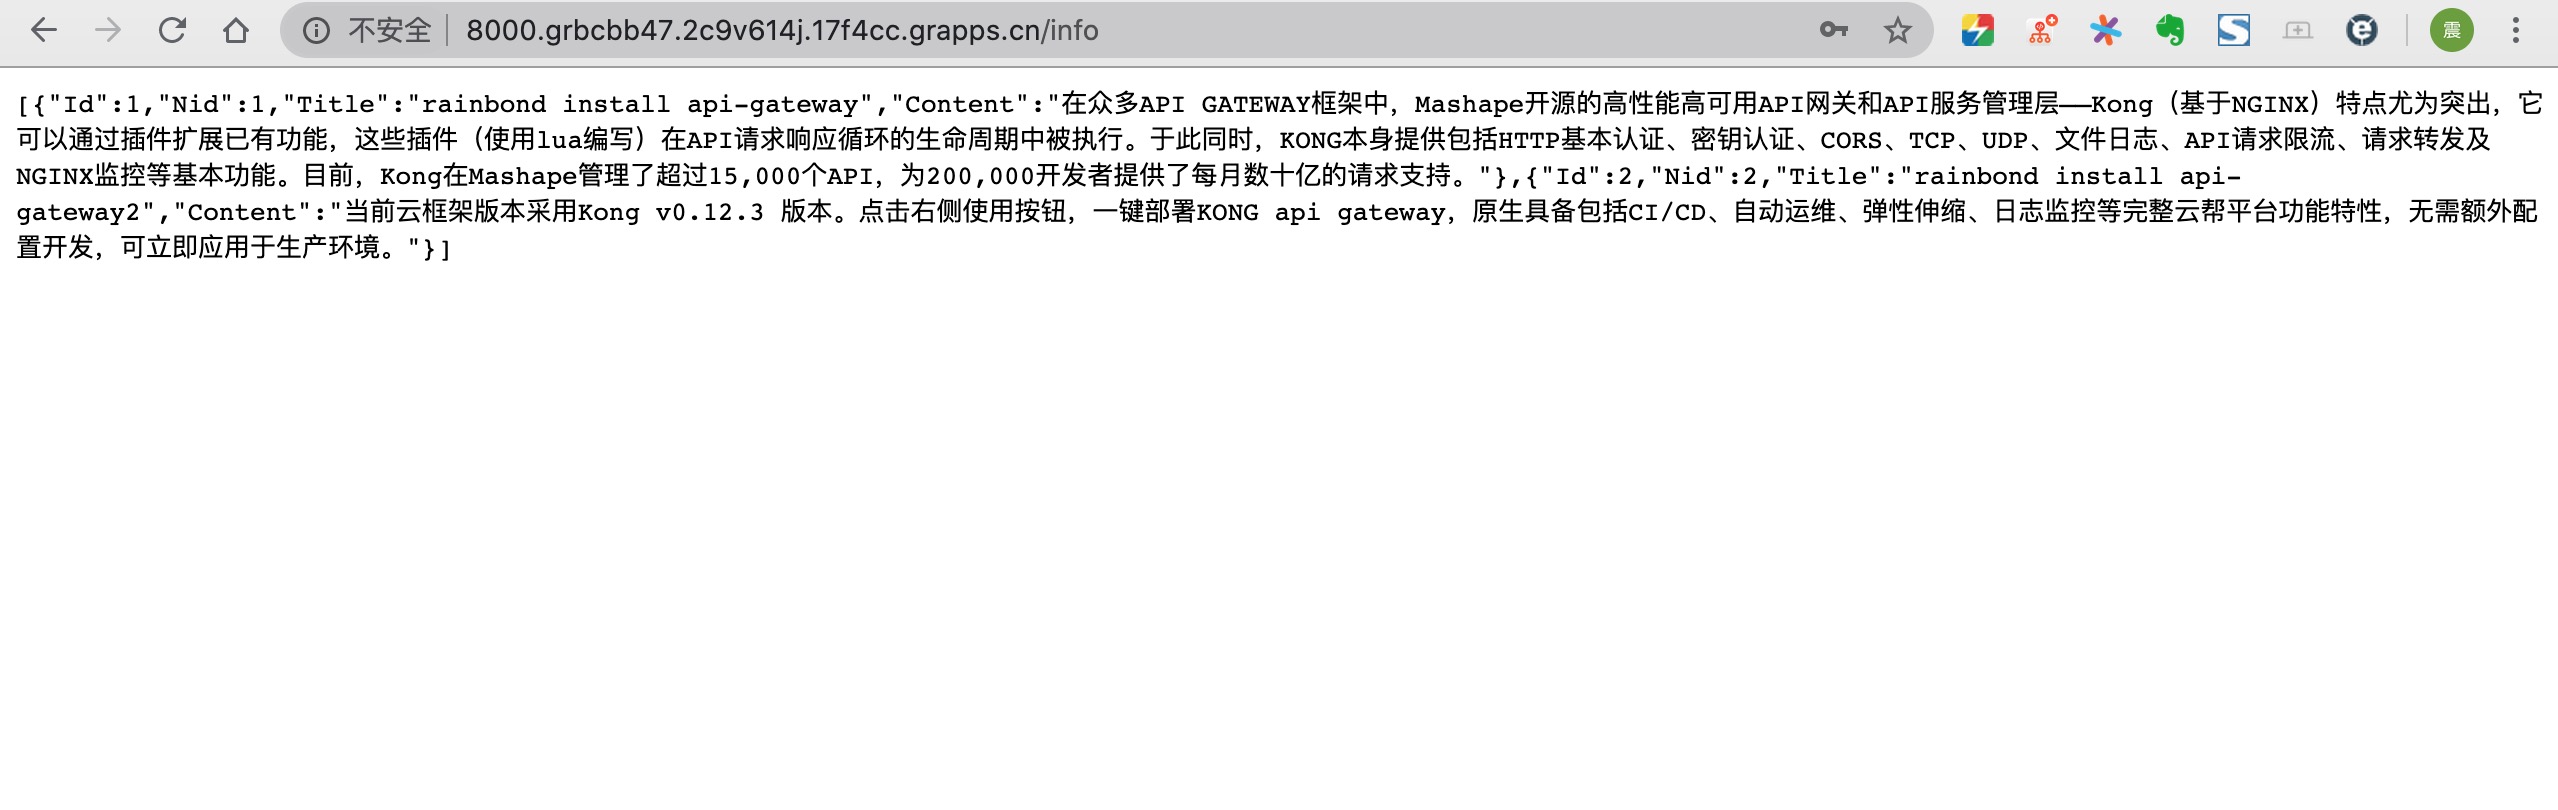
After the configuration is complete, access the /info path of the Kong service component port 8000 external service, you can access the newinfo test service and get the return.
Verify configuration
After all the configuration is completed, you can see the following information in the Konga panel:


Show results
After all the configurations are completed, you can access the test service by accessing the external address exposed by Kong's port 8000 and the corresponding path.
- WebService

- newinfo

Plug-in function expansion
Overview
For Kong, plug-ins are like the aop function in Spring; after the request reaches Kong and before it is forwarded to the back-end application, use the plug-in that comes with Kong to process the request, identity authentication, fuse current limiting, black and white list verification, logging At the same time, you can also customize and develop your own plug-ins according to Kong's tutorial documents.
Here we will demonstrate the implementation of Api-Key authentication and ACL policy authentication (access control) based on the plug-in mechanism of Kong.
Preconditions
The WebService or newinfo has been proxied through the above operations
Steps
Key Auth plugin
- Add plugin
In Konga, select PLUGINS , click ADD GLOAL PLUGINS , select Key Auth plugin, click ADD PLUGIN;
Fill in the content
| option name | Fill in the content | illustrate |
|---|---|---|
| consumer | Leave blank by default | Fill in custom username |
| key names | api_key | Fill in the custom key name |
Note:to take effect after filling in the content of key names and pressing Enter
- create user
Click Consumers , select CREATE CONSUMER , enter to customize the user name , click SUBIT CONSUMER to submit;
- Fill in api_key
Click Credentials , select API KEYS , click CREATE API KEY , fill in custom key , fill in and submit.
At this point, the Api-Key authentication based on the Key Auth plug-in is completed. For the specific effect, please refer to the effect display below.
ACL+Basic Auth plugin
The ACL authorization policy grouping must be based on the authentication mechanism. Before the policy takes effect, at least one auth authentication plug-in must be enabled in the api. Here we use the combination of ACL plug-in and Basic Auth plug-in.
Before starting, you need to disable or delete the previously opened api_key plugin, so as not to affect
- Activate the authorization policy grouping plug-in
In Konga, select PLUGINS , click ADD GLOAL PLUGINS , select Basic Auth plug-in, click ADD PLUGIN , no need to fill in the content, just activate;
In the same way find Acl plugin in Seeurity , click ADD PLUGIN
Fill in the content
| option name | Fill in the content | illustrate |
|---|---|---|
| consumer | Leave blank by default | Fill in custom username |
| whitelist | open | custom whitelist |
| blacklist | Leave blank by default | custom blacklist |
It should be noted that after adding the black and white list, you need to enter to take effect
- create user
Click Consumers , select CREATE CONSUMER , enter to customize the user name , click SUBIT CONNUMER to submit; the same operation creates two users.
- Assign authorization policy groups to users
Both users need to operate
Click Groups ,Add a group , customize a group name , which needs to correspond to the black and white list
- Add Basic Auth authentication user and password
Both users need to operate
Click Consumers ,Credentials , find Basic , click CREATE CREDENTIALS , customize user name and password , which will be used in subsequent browser access.
Show results
Key Auth plugin
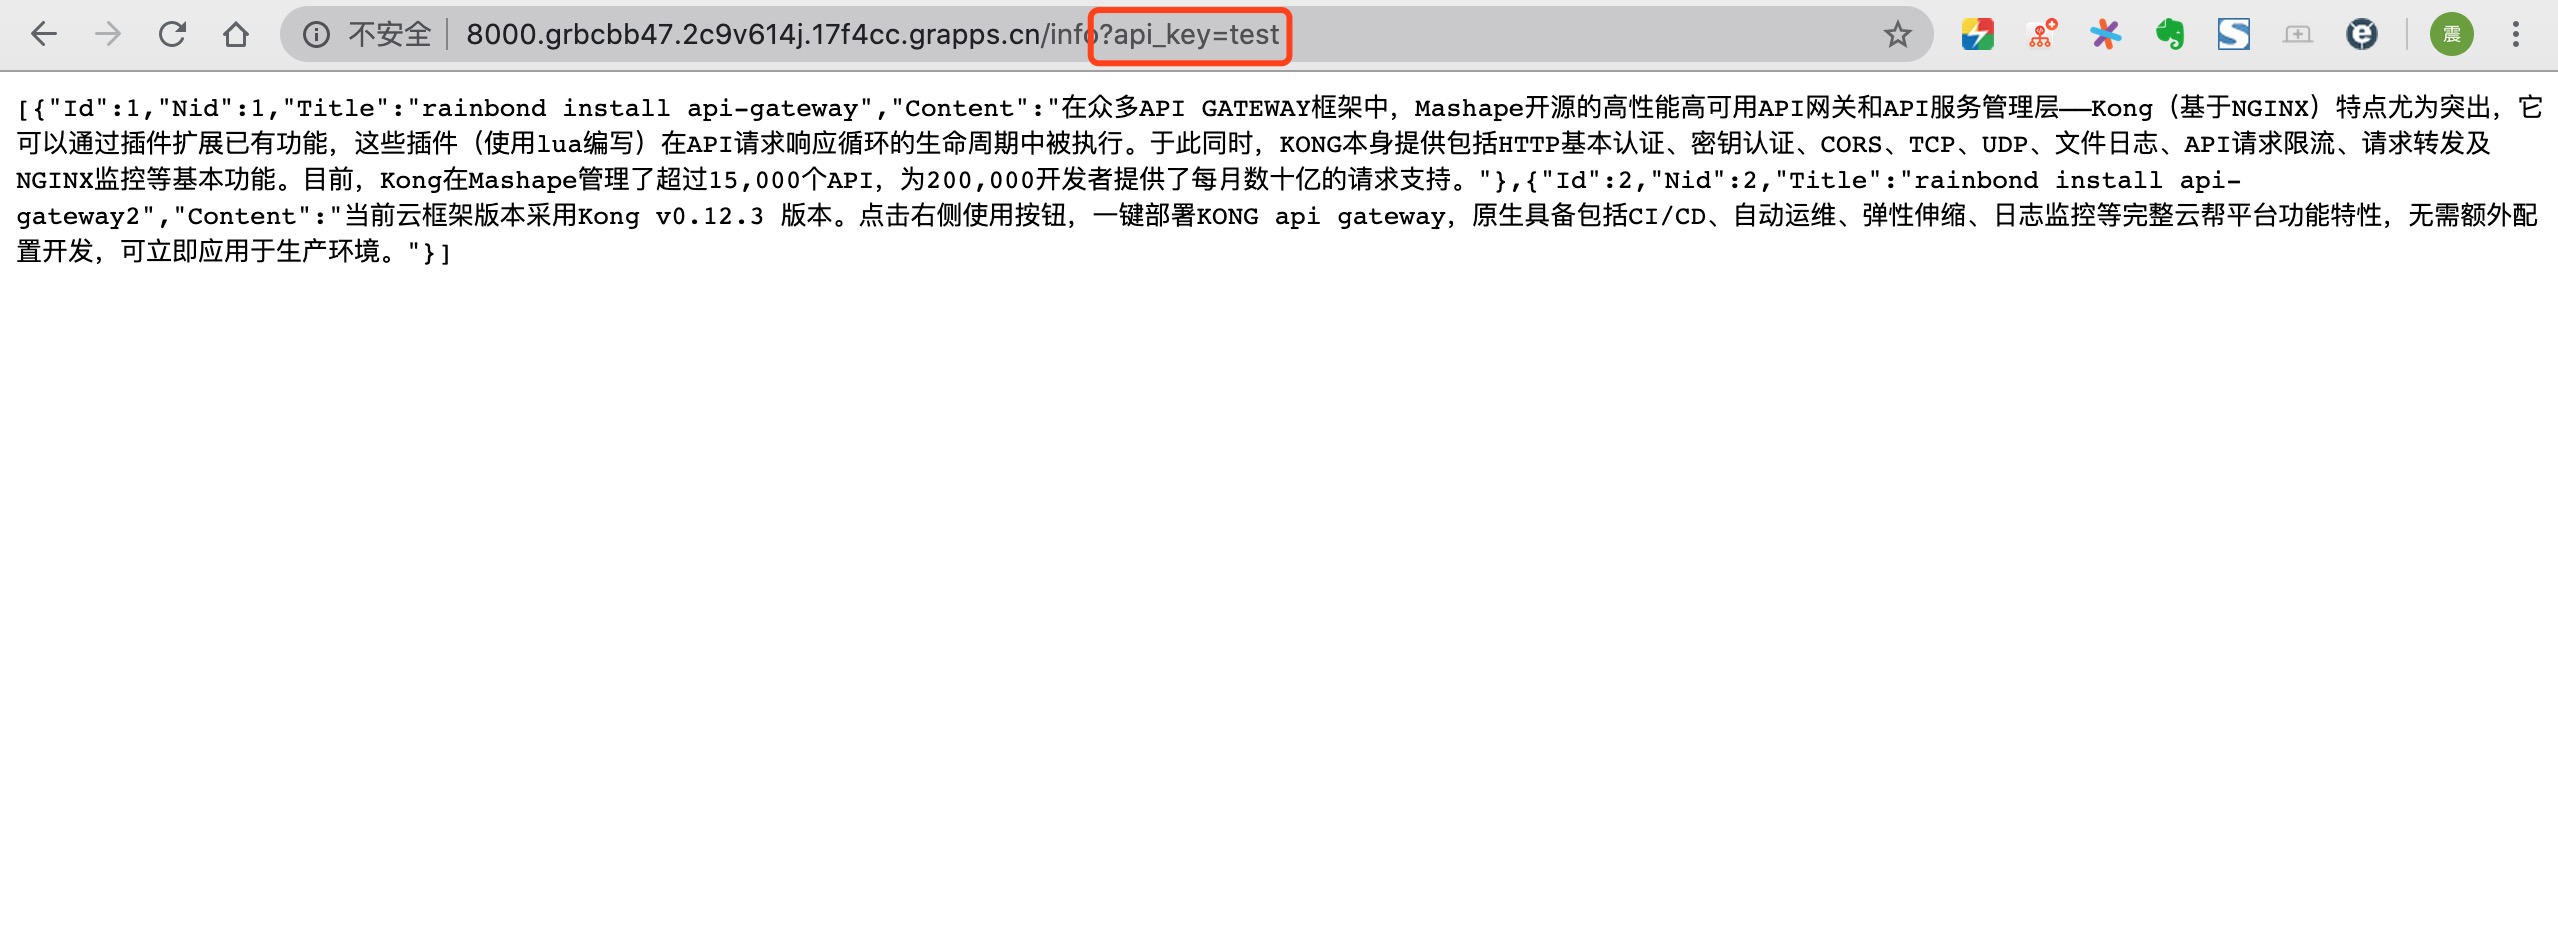
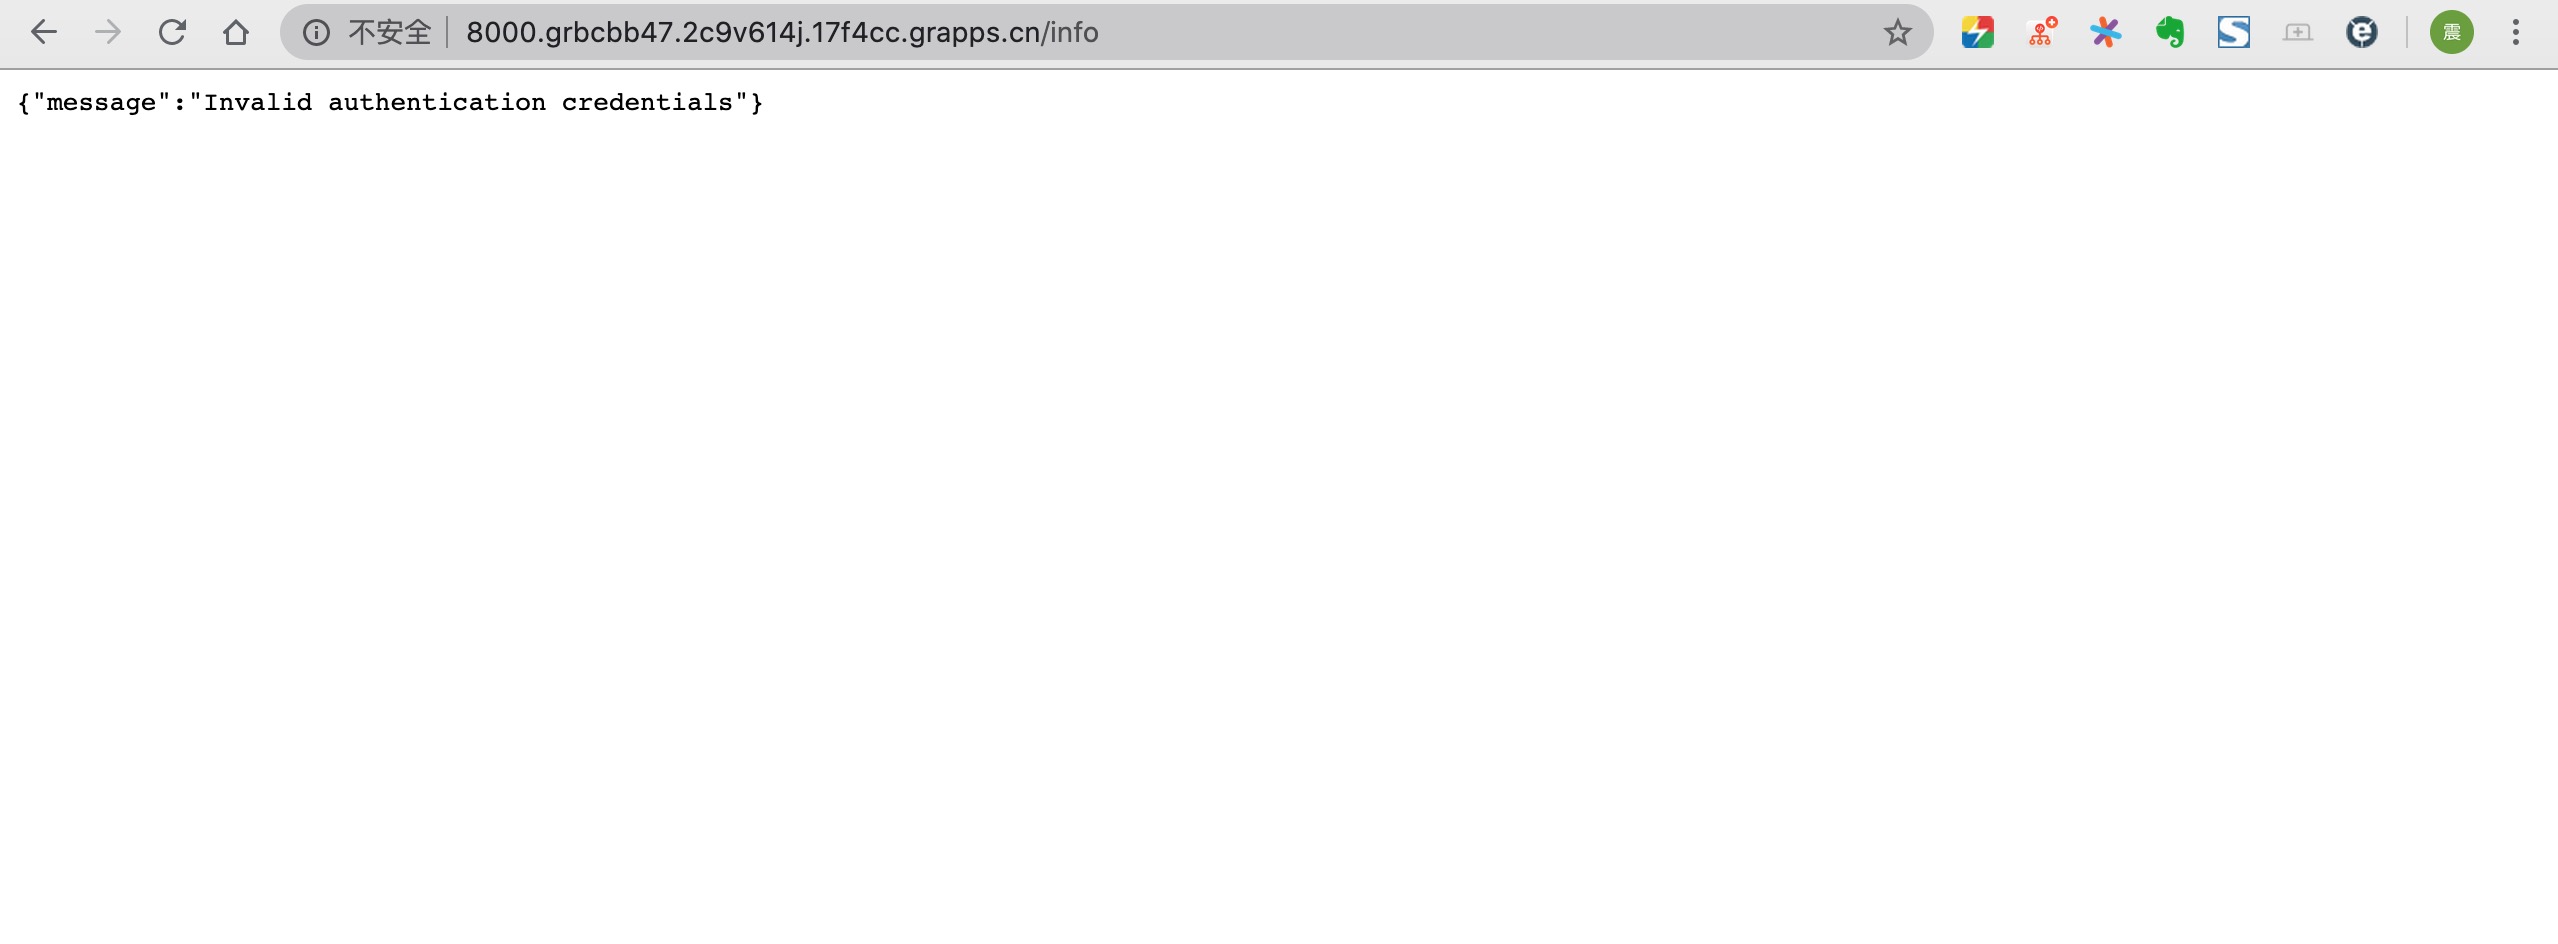
To access WebService or newinfo service, you must add the defined api_key to access.
ACL+Basic Auth plugin
To access the WebService or newinfo service, you must fill in the user and password when accessing, and fill in the Basic Auth authentication user and password defined above. You cannot access when you use the black user to access, but can access normally when you use the open user to access, indicating that only with the api authorization policy Only grouped users can call this api.
- Access with black user
- The open user can access normally